Crispy Honey Butter Garlic Chicken Tenders are the kind of dinner that instantly makes people gather around the table. The crispy coating, buttery garlic flavor, and sweet honey glaze create an irresistible mix of crunchy, sticky, savory goodness that feels both comforting and exciting. Every bite delivers juicy chicken wrapped in a golden crust with a rich buttery finish.
What makes this recipe special is how simple ingredients come together to taste restaurant-quality at home. In my experience, the honey butter garlic sauce is what keeps everyone coming back for seconds. It coats the tenders perfectly without making them soggy. These chicken tenders are ideal for busy weeknights, game days, casual family dinners, or even party platters because they look impressive while staying beginner friendly.
Why You’ll Love This Recipe

These Crispy Honey Butter Garlic Chicken Tenders are packed with flavor while still being easy enough for beginner cooks. The outside stays crunchy while the inside stays tender and juicy, creating the perfect texture combination. I’ve noticed that recipes with both sweet and savory flavors usually become family favorites quickly, and this one always disappears fast.
Another reason to love this recipe is its flexibility. You can serve the tenders as a main dish, appetizer, snack, or even inside wraps and sandwiches. The honey garlic butter sauce adds a glossy finish that makes the dish look beautiful in photos, which is perfect for Pinterest-worthy meals. Plus, most of the ingredients are pantry staples, making this recipe practical for everyday cooking without sacrificing flavor.
Ingredients
For the Chicken Tenders:
- 2 pounds chicken tenders
- 1 cup all-purpose flour
- 2 large eggs
- 1 ½ cups panko breadcrumbs
- 1 teaspoon garlic powder
- 1 teaspoon paprika
- 1 teaspoon salt
- ½ teaspoon black pepper
- Vegetable oil for frying
- For the Honey Butter Garlic Sauce:
- 4 tablespoons butter
- 4 garlic cloves, minced
- ⅓ cup honey
- 1 tablespoon soy sauce
- 1 tablespoon chopped fresh parsley
These ingredients create the perfect balance of crispy texture and rich flavor. I’ve tried regular breadcrumbs before, but panko gives a much crunchier finish that stays crisp longer after adding the sauce.
How to Make It
Step 1
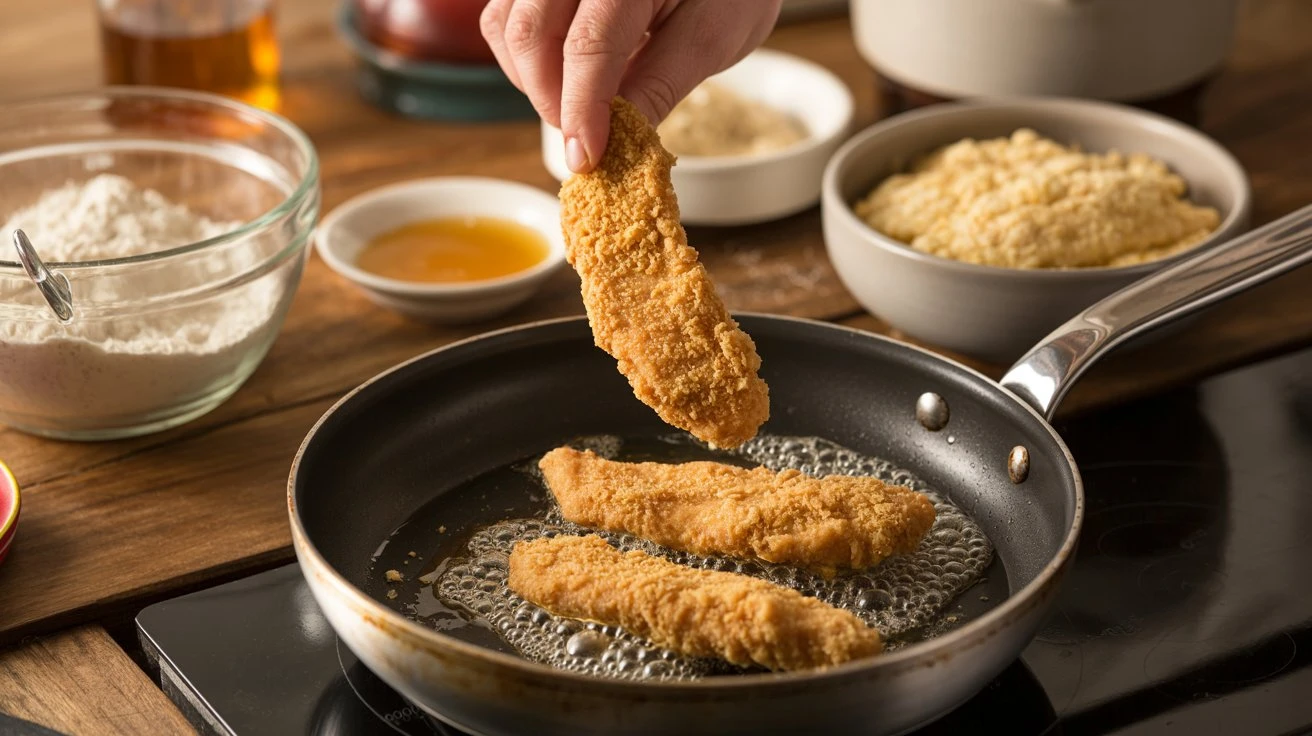
Start by patting the chicken tenders dry with paper towels. This small step helps the coating stick better and keeps the tenders crispy during frying. In one bowl, add the flour with garlic powder, paprika, salt, and black pepper. In another bowl, whisk the eggs until smooth. Fill a third bowl with panko breadcrumbs. Arrange the bowls in order to create an easy breading station. I’ve noticed this setup makes the cooking process much less messy and helps beginners work more confidently. Keeping everything organized before frying also prevents the breadcrumbs from becoming clumpy or soggy.
Step 2
Take each chicken tender and coat it lightly in the seasoned flour. Shake off any extra flour before dipping it into the egg mixture. Finally, press the chicken into the panko breadcrumbs until fully coated on all sides. Place the breaded tenders on a tray or plate while you finish the rest. Pressing the breadcrumbs firmly helps create an extra crispy texture after frying. In my experience, letting the coated chicken rest for about five minutes before cooking helps the crust stay attached better. This simple waiting step can make a noticeable difference in achieving evenly crispy chicken tenders.
Step 3
Pour vegetable oil into a deep skillet or heavy pan until it reaches about two inches high. Heat the oil over medium heat until hot but not smoking. To test it, drop in a small breadcrumb. If it sizzles immediately, the oil is ready. Carefully place a few chicken tenders into the pan without overcrowding. Frying too many at once lowers the oil temperature and can make the coating greasy instead of crispy. Cook the tenders for about 4–5 minutes per side until deeply golden brown and cooked through. The kitchen will already smell buttery and savory at this stage.
Step 4
Transfer the cooked chicken tenders onto a wire rack or paper towel-lined plate to remove excess oil. While they rest, continue frying the remaining batches. I’ve noticed using a wire rack keeps the tenders crispier because steam does not get trapped underneath. As the tenders cool slightly, the coating becomes even crunchier. This is the perfect moment to prepare the honey butter garlic sauce. The crispy chicken paired with the glossy sauce creates that irresistible restaurant-style texture people love. Keeping the chicken warm in a low-temperature oven while cooking the remaining batches also works very well for larger family meals.
Step 5
In a separate skillet, melt the butter over medium-low heat. Add the minced garlic and cook for about one minute until fragrant. Be careful not to burn the garlic because it can turn bitter quickly. Stir in the honey and soy sauce until everything becomes smooth and glossy. The sauce should gently bubble while thickening slightly. In my experience, fresh garlic gives the sauce a richer flavor compared to garlic powder. The mixture should smell sweet, buttery, and savory all at once. This sauce is what transforms ordinary chicken tenders into something truly unforgettable and incredibly crave-worthy.
Step 6
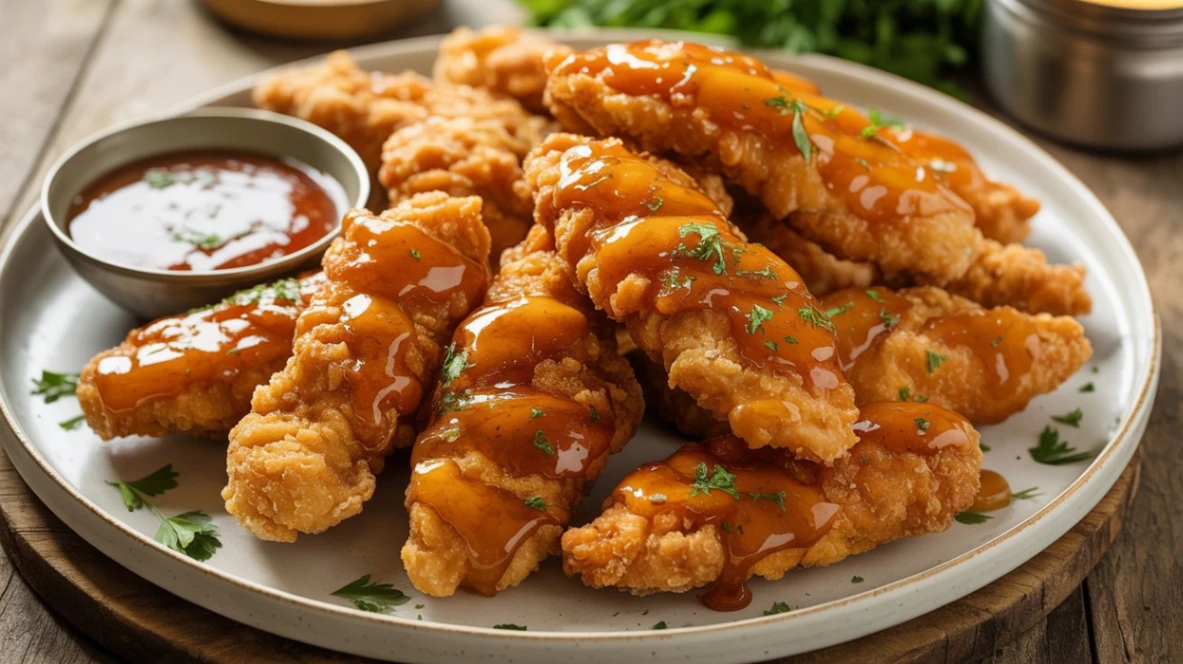
Add the crispy chicken tenders directly into the skillet with the honey butter garlic sauce. Gently toss each piece until fully coated. The sauce should cling to the crunchy coating while still allowing the crispy texture to shine through. I’ve tried pouring the sauce over the tenders instead, but tossing them directly in the pan coats them more evenly. Sprinkle chopped parsley over the chicken for freshness and color. The glossy glaze combined with the golden crust creates a beautiful finish that looks just as impressive as it tastes. Serve immediately while the tenders are still hot and crispy.
Step 7
Arrange the Crispy Honey Butter Garlic Chicken Tenders on a serving platter with extra parsley or dipping sauce if desired. These tenders pair perfectly with fries, coleslaw, roasted vegetables, or buttery mashed potatoes. If serving for parties or game nights, keep them warm in the oven at a low temperature until ready to eat. I’ve noticed guests usually reach for these first because the aroma alone is impossible to ignore. The sticky honey glaze and crunchy coating create an addictive texture combination that feels comforting yet exciting. Serve them fresh for the best flavor, crunch, and overall experience.
Cooking Tips / Variations
For extra crispy chicken tenders, always avoid overcrowding the frying pan. Keeping space between the tenders helps them fry evenly and stay crunchy. In my experience, maintaining medium heat works better than high heat because the coating browns nicely without burning before the chicken cooks through.
You can easily customize the flavor by adding cayenne pepper for heat or smoked paprika for a deeper smoky taste. I’ve tried using chicken breasts sliced into strips when tenders were unavailable, and it worked very well. For a lighter version, the tenders can also be air-fried until crispy before tossing them in the honey butter garlic sauce. Fresh parsley or sesame seeds make excellent finishing touches for extra color and texture.
Serving or Storage Tips
These Crispy Honey Butter Garlic Chicken Tenders taste best served fresh while the coating is still crunchy and warm. Pair them with fries, roasted vegetables, salad, or buttery rice for a complete meal. They also work beautifully inside wraps or sliders for casual lunches.
If you have leftovers, store them in an airtight container in the refrigerator for up to three days. I’ve noticed reheating them in the oven or air fryer keeps the coating much crispier compared to the microwave. For best results, warm them at 375°F for several minutes until heated through. You can also prepare the breaded chicken ahead of time and refrigerate it before frying, which makes busy dinners much easier.
Conclusion
These Crispy Honey Butter Garlic Chicken Tenders are the perfect mix of crunchy, juicy, sweet, and savory flavors that make homemade comfort food feel extra special. The crispy golden coating paired with the rich honey garlic butter sauce creates a meal that feels exciting while still being simple enough for beginner cooks.
Whether you serve them for family dinners, parties, or weekend cravings, this recipe delivers restaurant-style flavor with easy everyday ingredients. Save this recipe on Pinterest so you can come back to it anytime you need a guaranteed crowd-pleaser. Try it in your own kitchen, share it with friends and family, and enjoy every crispy, buttery bite. Good food always brings people together.

Crispy Honey Butter Garlic Chicken Tenders
4
servings15
minutes20
minutes35
minutesIngredients
- For the Chicken Tenders:
2 pounds chicken tenders
1 cup all-purpose flour
2 large eggs
1 ½ cups panko breadcrumbs
1 teaspoon garlic powder
1 teaspoon paprika
1 teaspoon salt
½ teaspoon black pepper
Vegetable oil for frying
- For the Honey Butter Garlic Sauce:
4 tablespoons butter
4 garlic cloves, minced
⅓ cup honey
1 tablespoon soy sauce
1 tablespoon chopped fresh parsley
How to Make it
- Start by patting the chicken tenders dry with paper towels. This small step helps the coating stick better and keeps the tenders crispy during frying. In one bowl, add the flour with garlic powder, paprika, salt, and black pepper. In another bowl, whisk the eggs until smooth. Fill a third bowl with panko breadcrumbs. Arrange the bowls in order to create an easy breading station. I’ve noticed this setup makes the cooking process much less messy and helps beginners work more confidently. Keeping everything organized before frying also prevents the breadcrumbs from becoming clumpy or soggy.
- Take each chicken tender and coat it lightly in the seasoned flour. Shake off any extra flour before dipping it into the egg mixture. Finally, press the chicken into the panko breadcrumbs until fully coated on all sides. Place the breaded tenders on a tray or plate while you finish the rest. Pressing the breadcrumbs firmly helps create an extra crispy texture after frying. In my experience, letting the coated chicken rest for about five minutes before cooking helps the crust stay attached better. This simple waiting step can make a noticeable difference in achieving evenly crispy chicken tenders.
- Pour vegetable oil into a deep skillet or heavy pan until it reaches about two inches high. Heat the oil over medium heat until hot but not smoking. To test it, drop in a small breadcrumb. If it sizzles immediately, the oil is ready. Carefully place a few chicken tenders into the pan without overcrowding. Frying too many at once lowers the oil temperature and can make the coating greasy instead of crispy. Cook the tenders for about 4–5 minutes per side until deeply golden brown and cooked through. The kitchen will already smell buttery and savory at this stage.
- Transfer the cooked chicken tenders onto a wire rack or paper towel-lined plate to remove excess oil. While they rest, continue frying the remaining batches. I’ve noticed using a wire rack keeps the tenders crispier because steam does not get trapped underneath. As the tenders cool slightly, the coating becomes even crunchier. This is the perfect moment to prepare the honey butter garlic sauce. The crispy chicken paired with the glossy sauce creates that irresistible restaurant-style texture people love. Keeping the chicken warm in a low-temperature oven while cooking the remaining batches also works very well for larger family meals.
- In a separate skillet, melt the butter over medium-low heat. Add the minced garlic and cook for about one minute until fragrant. Be careful not to burn the garlic because it can turn bitter quickly. Stir in the honey and soy sauce until everything becomes smooth and glossy. The sauce should gently bubble while thickening slightly. In my experience, fresh garlic gives the sauce a richer flavor compared to garlic powder. The mixture should smell sweet, buttery, and savory all at once. This sauce is what transforms ordinary chicken tenders into something truly unforgettable and incredibly crave-worthy.
- Add the crispy chicken tenders directly into the skillet with the honey butter garlic sauce. Gently toss each piece until fully coated. The sauce should cling to the crunchy coating while still allowing the crispy texture to shine through. I’ve tried pouring the sauce over the tenders instead, but tossing them directly in the pan coats them more evenly. Sprinkle chopped parsley over the chicken for freshness and color. The glossy glaze combined with the golden crust creates a beautiful finish that looks just as impressive as it tastes. Serve immediately while the tenders are still hot and crispy.
- Arrange the Crispy Honey Butter Garlic Chicken Tenders on a serving platter with extra parsley or dipping sauce if desired. These tenders pair perfectly with fries, coleslaw, roasted vegetables, or buttery mashed potatoes. If serving for parties or game nights, keep them warm in the oven at a low temperature until ready to eat. I’ve noticed guests usually reach for these first because the aroma alone is impossible to ignore. The sticky honey glaze and crunchy coating create an addictive texture combination that feels comforting yet exciting. Serve them fresh for the best flavor, crunch, and overall experience.
FAQ 1: Can I make Crispy Honey Butter Garlic Chicken Tenders in the air fryer?
Yes, these chicken tenders work very well in the air fryer. Spray the breaded tenders lightly with oil and cook them at 400°F for about 10–12 minutes, flipping halfway through. I’ve noticed the air fryer keeps them surprisingly crispy while using much less oil than deep frying.
FAQ 2: How do I keep chicken tenders crispy after adding the sauce?
The best way to keep Crispy Honey Butter Garlic Chicken Tenders crunchy is to avoid soaking them in too much sauce. Toss them lightly right before serving instead of letting them sit for long periods. Using panko breadcrumbs also helps the coating stay crisp longer.
FAQ 3: Can I use chicken breasts instead of chicken tenders?
Absolutely. Slice boneless chicken breasts into even strips before breading and frying. In my experience, thinner strips cook more evenly and stay juicy inside. Chicken thighs can also work if you prefer darker meat with a richer flavor.
FAQ 4: What sauces pair well with Crispy Honey Butter Garlic Chicken Tenders?
These chicken tenders pair wonderfully with ranch dressing, spicy mayo, honey mustard, barbecue sauce, or even extra garlic butter sauce. If you enjoy spicy flavors, adding a drizzle of hot honey creates an amazing sweet-and-spicy combination.
FAQ 5: Can I prepare the chicken tenders ahead of time?
Yes, you can bread the chicken tenders several hours ahead and store them covered in the refrigerator until ready to fry. I’ve tried this for busy evenings, and it saves a lot of time. Fry them fresh for the crispiest texture and best flavor.


One Comment