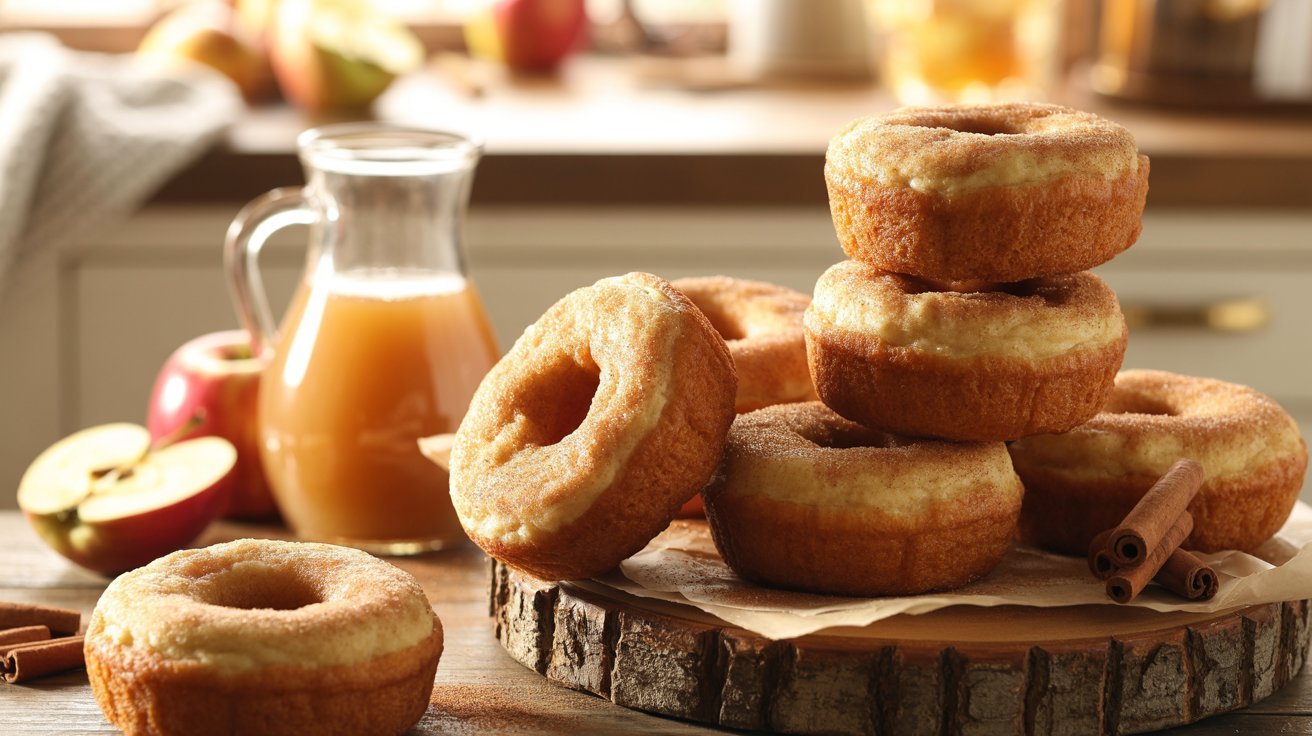
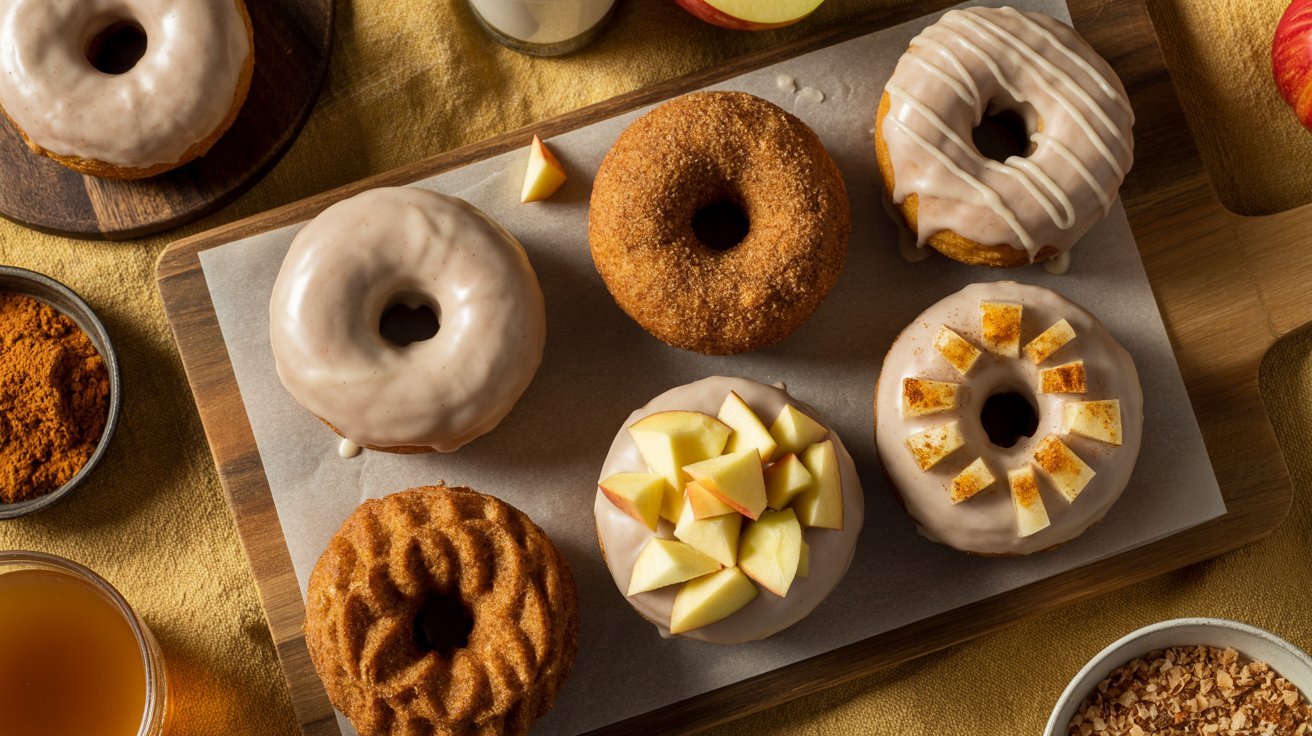
There’s something unforgettable about warm Apple Cider Doughnuts fresh from the kitchen. The sweet apple aroma, soft cakey center, and cinnamon-sugar coating instantly make your home feel cozy and comforting. These doughnuts bring classic fall bakery flavors into an easy homemade recipe that feels special without being difficult.
What makes this recipe stand out is the rich apple cider flavor baked right into the dough. In my experience, reducing the cider before mixing creates a deeper, more concentrated taste that makes every bite feel warm and nostalgic. I’ve noticed homemade versions taste softer and fresher than store-bought doughnuts, especially when enjoyed slightly warm. Whether you’re baking for a weekend breakfast, holiday gathering, or cozy evening treat, these doughnuts are simple, beautiful, and incredibly satisfying.
Why You’ll Love This Recipe
These Apple Cider Doughnuts are everything people love about cozy fall baking. They have a soft cake-like texture with crisp cinnamon sugar on the outside and a gentle apple flavor throughout. The balance of sweetness and spice makes them feel comforting without being overly heavy.
One reason this recipe works so well is that it uses simple pantry ingredients while still tasting bakery quality. I’ve tried several versions over the years, and this method consistently creates tender doughnuts that stay moist for days. They’re also beginner friendly because there’s no yeast or complicated frying process involved. You can bake them quickly for breakfast, brunch, or afternoon snacks. Plus, the smell of cinnamon and apple filling the kitchen is honestly one of the best parts.
Ingredients
- 2 cups all-purpose flour
- 1 cup apple cider
- 1 teaspoon baking powder
- 1/2 teaspoon baking soda
- 1 teaspoon ground cinnamon
- 1/4 teaspoon nutmeg
- 1/2 teaspoon salt
- 1/2 cup brown sugar
- 1/4 cup granulated sugar
- 2 large eggs
- 1/2 cup melted butter
- 1 teaspoon vanilla extract
For the coating:
- 1/2 cup granulated sugar
- 1 teaspoon cinnamon
- 3 tablespoons melted butter
These ingredients create soft, flavorful Apple Cider Doughnuts with warm spice and rich apple flavor. In my experience, using real apple cider instead of juice makes a noticeable difference because it gives the doughnuts a deeper taste. Fresh spices also help create that cozy bakery aroma people love.
How to Make It
Step 1
Start by pouring the apple cider into a small saucepan over medium heat. Let it simmer gently until it reduces to about half a cup. This usually takes around 15 minutes and helps intensify the apple flavor. I’ve noticed this simple step makes the doughnuts taste much richer and more bakery-style. Once reduced, allow the cider to cool slightly before using it in the batter. Meanwhile, preheat your oven to 350°F and lightly grease a doughnut pan so the baked doughnuts release easily later without sticking or breaking apart during removal from the pan.
Step 2
In a large mixing bowl, whisk together the flour, baking powder, baking soda, cinnamon, nutmeg, and salt until evenly combined. Mixing the dry ingredients first helps distribute the spices and leavening evenly through the batter. In my experience, this prevents uneven texture and gives every doughnut the same soft consistency. Make sure there are no lumps remaining in the flour mixture before moving on. The warm spice blend already starts creating that classic fall bakery aroma at this stage, which makes the entire kitchen smell comforting and inviting while preparing the recipe.
Step 3
In another bowl, combine the brown sugar, granulated sugar, eggs, melted butter, vanilla extract, and cooled reduced apple cider. Whisk until smooth and creamy. The mixture should look glossy and slightly thick from the sugars and butter blending together. I’ve tried using cold butter before, and the texture was never as smooth, so slightly warm melted butter works best here. Slowly pour the wet mixture into the dry ingredients while stirring gently. Mix only until combined because overmixing can make the doughnuts dense instead of soft and tender after baking.
Step 4
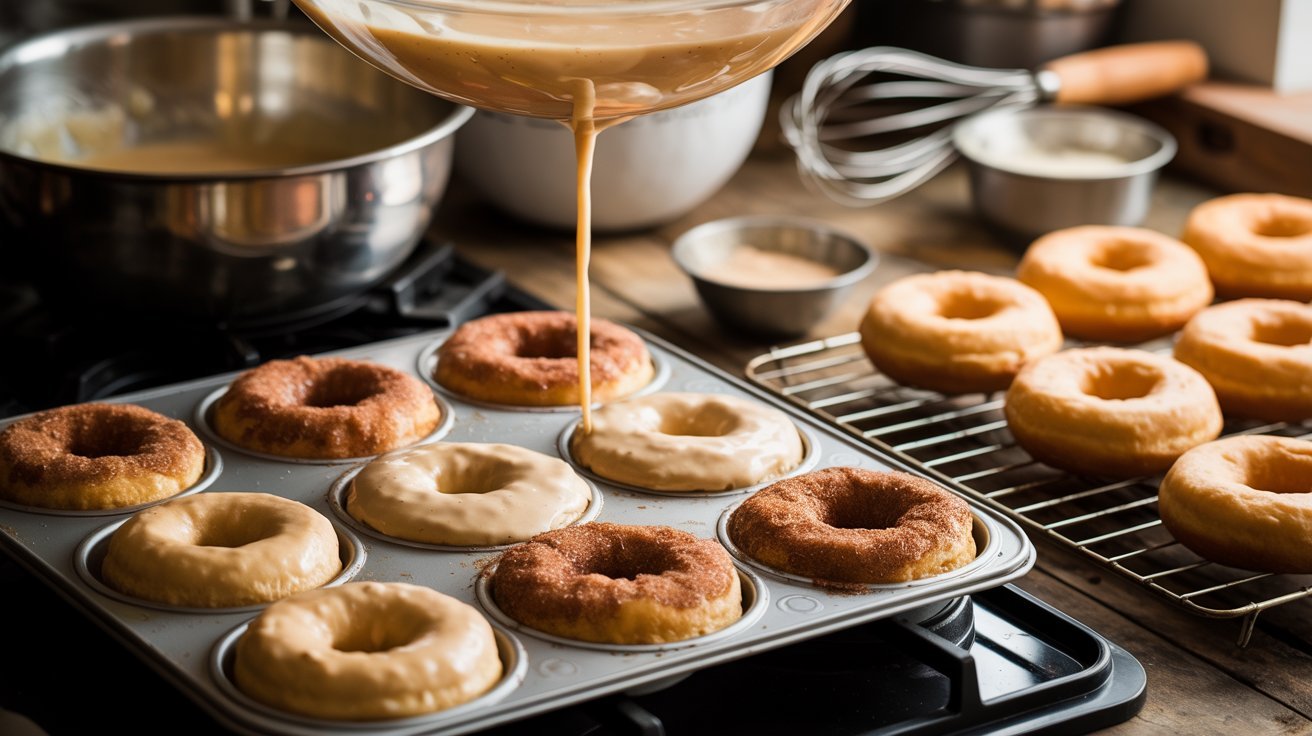
Transfer the batter into a piping bag or large zip-top bag with one corner snipped off. Carefully pipe the batter into the greased doughnut pan, filling each cavity about three-quarters full. This gives the doughnuts enough room to rise while baking without overflowing. I’ve noticed piping the batter instead of spooning it creates cleaner shapes and less mess in the kitchen. Smooth the tops gently if needed so they bake evenly. The batter should look thick but still soft enough to spread slightly once it enters the oven and begins rising beautifully.
Step 5
Place the doughnut pan into the preheated oven and bake for about 12 to 15 minutes. The doughnuts should appear lightly golden and spring back gently when touched. Avoid overbaking because even a few extra minutes can dry them out quickly. In my experience, checking them around the 12-minute mark gives the best results. Once baked, remove the pan from the oven and let the doughnuts cool for several minutes before transferring them to a wire rack. Cooling slightly helps them firm up while still keeping the centers soft and fluffy inside.
Step 6
While the doughnuts cool slightly, prepare the cinnamon sugar coating. In a shallow bowl, combine the granulated sugar and cinnamon until evenly mixed. Brush each warm doughnut lightly with melted butter, making sure the surface is coated without becoming soggy. Roll the doughnuts in the cinnamon sugar mixture until completely covered. I’ve noticed coating them while still slightly warm helps the sugar stick much better. The buttery cinnamon layer adds texture, sweetness, and that classic bakery-style finish that makes these doughnuts look and taste irresistible right away.
Step 7
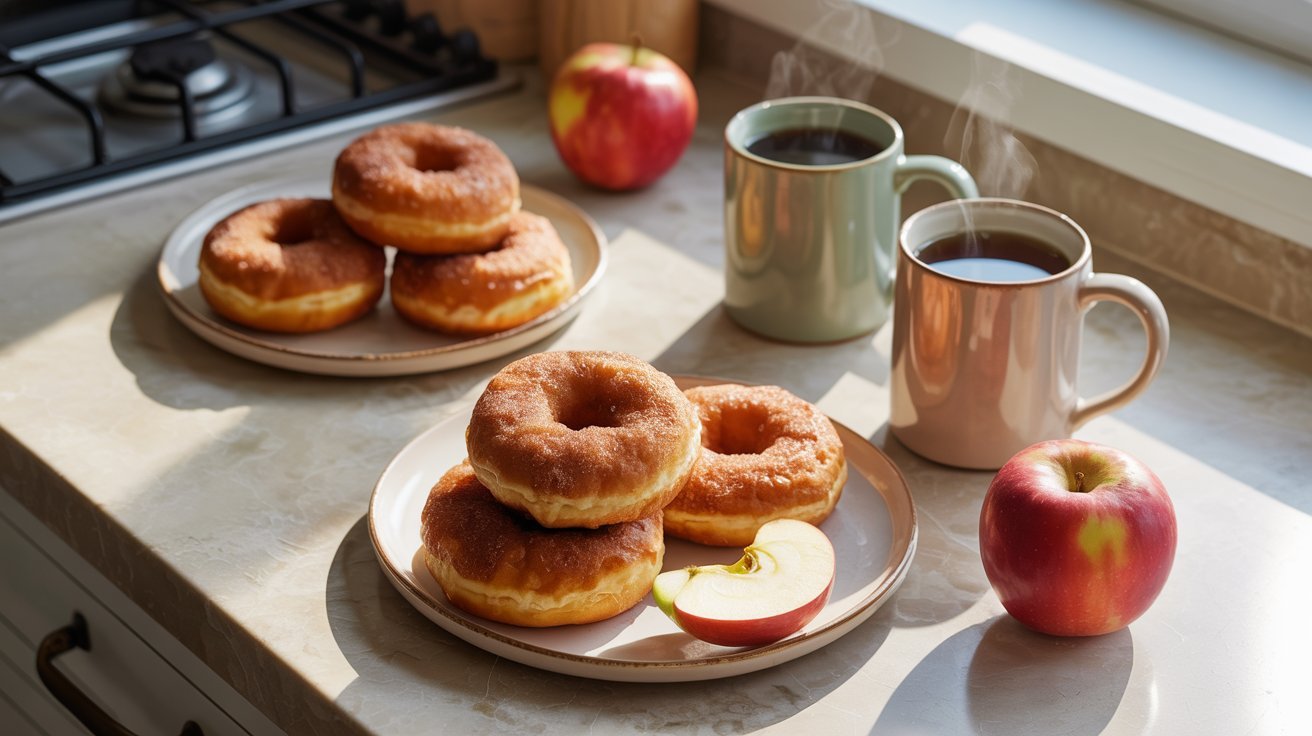
Arrange the finished Apple Cider Doughnuts on a serving plate or cooling rack and allow them to rest for a few more minutes before serving. This short resting time helps the coating settle and keeps the texture soft without becoming too delicate. The outside stays lightly crisp while the inside remains fluffy and moist. I’ve tried serving them immediately from the oven, but giving them a little time actually improves the overall texture. The warm apple aroma combined with cinnamon sugar makes them especially comforting alongside coffee, tea, or warm apple cider.
Cooking Tips / Variations
For the best Apple Cider Doughnuts, avoid overmixing the batter because it can make the texture heavy instead of soft and cakey. In my experience, stirring just until the flour disappears creates the fluffiest results. Reducing the cider is another important step because it concentrates the apple flavor beautifully.
You can also customize these doughnuts in fun ways. Add finely chopped apples for extra texture or drizzle them with maple glaze instead of cinnamon sugar. I’ve noticed a pinch of cardamom adds an amazing warm flavor during colder months. If you prefer a richer finish, try dipping half the doughnut in melted white chocolate for a bakery-style variation.
Serving or Storage Tips
Apple Cider Doughnuts taste best slightly warm when the cinnamon sugar coating still feels fresh and crisp. Serve them with coffee, chai tea, or hot apple cider for a cozy breakfast or afternoon treat. I’ve seen these work especially well for brunch tables and fall gatherings because they look beautiful and smell incredible.
To store leftovers, place the doughnuts in an airtight container at room temperature for up to two days. For longer storage, refrigerate them for about five days. Warm them in the microwave for a few seconds before serving to bring back their soft texture. In my experience, adding fresh cinnamon sugar after reheating helps refresh the flavor perfectly.
Conclusion
Apple Cider Doughnuts are one of those cozy homemade treats that instantly make a kitchen feel warm and welcoming. From the soft apple-flavored center to the sweet cinnamon sugar coating, every bite feels comforting and satisfying. They’re simple enough for beginners yet delicious enough to feel bakery quality right at home.
Whether you bake them for a weekend breakfast, holiday brunch, or cozy fall dessert, this recipe is worth saving and sharing. Try these Apple Cider Doughnuts in your own kitchen, save the recipe on Pinterest for later, and enjoy them with family and friends. Sometimes the simplest homemade recipes become the most unforgettable memories.

Apple Cider Doughnuts
12 Doughnuts
servings15
minutes15
minutes30
minutesIngredients
2 cups all-purpose flour
1 cup apple cider
1 teaspoon baking powder
1/2 teaspoon baking soda
1 teaspoon ground cinnamon
1/4 teaspoon nutmeg
1/2 teaspoon salt
1/2 cup brown sugar
1/4 cup granulated sugar
2 large eggs
1/2 cup melted butter
1 teaspoon vanilla extract
- For Coating
2 cups all-purpose flour
1 cup apple cider
1 teaspoon baking powder
How to Make it
- Start by pouring the apple cider into a small saucepan over medium heat. Let it simmer gently until it reduces to about half a cup. This usually takes around 15 minutes and helps intensify the apple flavor. I’ve noticed this simple step makes the doughnuts taste much richer and more bakery-style. Once reduced, allow the cider to cool slightly before using it in the batter. Meanwhile, preheat your oven to 350°F and lightly grease a doughnut pan so the baked doughnuts release easily later without sticking or breaking apart during removal from the pan.
- In a large mixing bowl, whisk together the flour, baking powder, baking soda, cinnamon, nutmeg, and salt until evenly combined. Mixing the dry ingredients first helps distribute the spices and leavening evenly through the batter. In my experience, this prevents uneven texture and gives every doughnut the same soft consistency. Make sure there are no lumps remaining in the flour mixture before moving on. The warm spice blend already starts creating that classic fall bakery aroma at this stage, which makes the entire kitchen smell comforting and inviting while preparing the recipe.
- In another bowl, combine the brown sugar, granulated sugar, eggs, melted butter, vanilla extract, and cooled reduced apple cider. Whisk until smooth and creamy. The mixture should look glossy and slightly thick from the sugars and butter blending together. I’ve tried using cold butter before, and the texture was never as smooth, so slightly warm melted butter works best here. Slowly pour the wet mixture into the dry ingredients while stirring gently. Mix only until combined because overmixing can make the doughnuts dense instead of soft and tender after baking.
- Transfer the batter into a piping bag or large zip-top bag with one corner snipped off. Carefully pipe the batter into the greased doughnut pan, filling each cavity about three-quarters full. This gives the doughnuts enough room to rise while baking without overflowing. I’ve noticed piping the batter instead of spooning it creates cleaner shapes and less mess in the kitchen. Smooth the tops gently if needed so they bake evenly. The batter should look thick but still soft enough to spread slightly once it enters the oven and begins rising beautifully.
- Place the doughnut pan into the preheated oven and bake for about 12 to 15 minutes. The doughnuts should appear lightly golden and spring back gently when touched. Avoid overbaking because even a few extra minutes can dry them out quickly. In my experience, checking them around the 12-minute mark gives the best results. Once baked, remove the pan from the oven and let the doughnuts cool for several minutes before transferring them to a wire rack. Cooling slightly helps them firm up while still keeping the centers soft and fluffy inside.
- While the doughnuts cool slightly, prepare the cinnamon sugar coating. In a shallow bowl, combine the granulated sugar and cinnamon until evenly mixed. Brush each warm doughnut lightly with melted butter, making sure the surface is coated without becoming soggy. Roll the doughnuts in the cinnamon sugar mixture until completely covered. I’ve noticed coating them while still slightly warm helps the sugar stick much better. The buttery cinnamon layer adds texture, sweetness, and that classic bakery-style finish that makes these doughnuts look and taste irresistible right away.
- Arrange the finished Apple Cider Doughnuts on a serving plate or cooling rack and allow them to rest for a few more minutes before serving. This short resting time helps the coating settle and keeps the texture soft without becoming too delicate. The outside stays lightly crisp while the inside remains fluffy and moist. I’ve tried serving them immediately from the oven, but giving them a little time actually improves the overall texture. The warm apple aroma combined with cinnamon sugar makes them especially comforting alongside coffee, tea, or warm apple cider.
FAQ 1: Can I make Apple Cider Doughnuts without a doughnut pan?
Yes, you can. If you do not have a doughnut pan, use a muffin tin instead. The texture and flavor will stay very similar, although the shape will change slightly. I’ve tried both methods, and the muffin version still tastes soft, moist, and delicious with the same cinnamon sugar coating.
FAQ 2: Why should I reduce the apple cider first?
Reducing the cider helps remove extra liquid while concentrating the apple flavor. This step gives Apple Cider Doughnuts a stronger, richer taste without making the batter too thin. In my experience, skipping the reduction creates doughnuts that taste much less flavorful and less bakery-style overall.
FAQ 3: Can Apple Cider Doughnuts be frozen?
Yes, these doughnuts freeze surprisingly well. Allow them to cool completely, then store them in a freezer-safe container for up to two months. For the best texture, thaw them at room temperature and warm slightly before serving. I’ve noticed adding fresh cinnamon sugar after reheating makes them taste freshly baked again.
FAQ 4: What is the best way to keep Apple Cider Doughnuts soft?
Store them in an airtight container at room temperature and avoid refrigerating them too quickly. Refrigeration can sometimes dry baked doughnuts out faster. In my experience, reheating them for about 10 seconds in the microwave helps restore their soft, fluffy texture before serving.
FAQ 5: Can I make Apple Cider Doughnuts ahead of time?
Absolutely. You can bake the doughnuts a day ahead and add the cinnamon sugar coating shortly before serving. This helps keep the outside coating fresh and slightly crisp. I’ve seen this work especially well when preparing for brunches, parties, or holiday mornings with less last-minute cooking.